Skip to content

Audio Analytics With Python – Creating Basic Audio Editor

This article explains about audio data analysis with python. The activity below gives a clear idea on reading audio files , plotting them & editing them adding convolutions. 
We shall learn all these by creating a  basic audio editor which helps introduce echos and modulations in an audio file and save them to your system.


What is audio ?

Audio has always been a 1-dimensional signal used to describe any noise or sound that is within a  range of  human ears to hear.

Basic unit of audio measurement is hertz.
Few of famous audio formats include MP3 , WAV , MPEG etc.

Why do we need audio analysis?

With huge buzz on natural language processing &  audio analysis this field includes  digital signal processing, automatic speech recognition,  music  generation and classification , audio analysis is gaining huge attention. 

The audio data analysis is all about analysing and understanding audio signals or voice/noise/music data.


Few of real word applications of audio analysis include alexa , echo etc.

How can we do audio analytics?

In simple terms , every audio wave has a frequency. Every frequency has a value.We humans can hear sound between 20 Hz (lowest pitch) to 20 kHz (highest pitch).  

Python Modules like  audio2numpy , scipy directly ouputs the audio data as a numpy array and its sampling rate. In the activity below we demo how can we modify audio files and get a feel on how audio processing / analytics can be done. 

In short , we are playing with sampling rate & checking out how it effects the audio file.

gif_1
This course doesn’t need any major prerequisites. 
 
Python VersionDifficulty LevelPre-Requisites 
2.7+EasyBasic Python

Download the input file from THIS LINK

”’
About the audio file (right click and check properties or info section ) :


lyrics : “oh yeah everything is fine”
type : “.wav”
sampling rate = 48000 Hz
bits per sample = 16


”’
”’
import necessary libraries
if you get “No Module found” errror; Try instaalling using : pip install <missing module name>
”’
import sys
import numpy as np


from scipy.io.wavfile import write
import wave


import matplotlib.pyplot as plt
%matplotlib inline
 
”’
Read the file
”’
f = wave.open(‘oh-yeah-everything-is-fine.wav’, ‘r’)
”’
Extract audio waves into numpy array
”’
audio = f.readframes(-1)
audio = np.fromstring(audio, ‘Int16’)


”’
Plot the signals
”’
plt.plot(audio)
plt.title(“My Audio Signals”)
audio_1
We are adding another convolution to the audio. This is like adding another audio dimension which creates echo & sound effects !
”’
Let’s try to modify audio
np.convolve is used to add a new discrete, linear convolution of two one-dimensional sequences.
”’


delta = np.array([1., 0., 0.])
modified_audio = np.convolve(audio, delta)
modified_audio.shape
#(169772,)
 
#np.int16 — > Done to keep audio in normal range. Else audio gets too loud
#4800 — > sampling rate


modified_audio = modified_audio.astype(np.int16)
write(‘modified_audio.wav’, 48000, modified_audio)
 

This creates an audio file in your system ! Just listen the echo 🙂 

We can slice, add , cut , edit any part of audio based on signal index (here it is 48000 i.e sampling rate)
”’
Let’s overwrite some indexes of audio & create a new echo
”’
modified_audio = np.zeros(48000)
#modified_audio[0] = 1. Try uncommenting these and see the difference
modified_audio[14000] = 0.1
#modified_audio[18000] = 1
#modified_audio[22000] = 1
#modified_audio[46000] = 1
#modified_audio[47800] = 1


modified_audio = np.convolve(audio, modified_audio)


modified_audio = modified_audio.astype(np.int16)

write(‘modified_audio2.wav’, 48000, modified_audio)

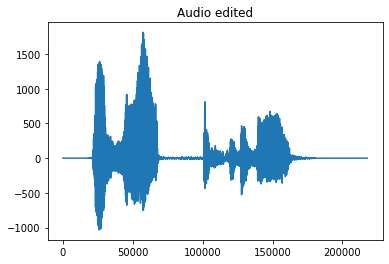
plt.plot(modified_audio)
plt.title(“Audio edited”)
aaudio_2

This creates an audio file in your system ! Just listen the edits  🙂 

Don’t miss out !